Amazon Web Services
AWS consists of a variety of different services, the ones relevant for this lab are listed below:
- Elastic Compute Cloud allows you to provision a variety of different machines that can be used to run a computation. An overview of the different machines and their use cases can be found on the EC2 website.
- Elastic MapReduce is a layer on top of EC2, that allows you to quickly deploy MapReduce-like applications, for instance Apache Spark.
- Simple Storage Server is an object based storage system that is easy to interact with from different AWS services.
AWS EC2 offers spot instances, a marketplace for unused machines that you can bid on. These spot instances are often an order of magnitude cheaper than on-demand instances. The current price list can be found in the EC2 website. We recommend using spot instances for the entirety of this lab. However, be aware that rarely AWS will reclaim a spot instance because someone is willing to pay more for it as an on-demand instance. When this happens, your cluster/job may fail.
Uploading your application
We will be using the AWS infrastructure to run the application. Log in to the AWS console, and open the S3 interface. Create a bucket where we can store the application JAR, and all the other files needed by your application.
There are (at least) two ways to transfer files to S3:
- The web interface, and
- The command line interface.
The web interface is straightforward to use. To use the command line interface, first install the AWS CLI. Some example operations are listed below.
To copy a file
aws s3 cp path/to/file s3://destination-bucket/path/to/file
To copy a directory recursively
aws s3 cp --recursive s3://origin-bucket/path/to/file
To move a file
aws s3 mv path/to/file s3://destination-bucket/path/to/file
The aws-cli contains much more functionality, which can be found on the AWS-CLI docs.
Creating the cluster
Once you have uploaded all the necessary files (again your application JAR, and all the files required by the application), we are ready to provision a cluster. Go to the EMR service, and select Create Cluster. Next select Go to advanced options, select the latest release, and check the frameworks you want to use. In this case this means Spark, Hadoop and Ganglia. Spark and Hadoop you already know, we will introduce Ganglia later in this chapter.
EMR works with steps, which can be thought of as a job, or the execution of a single application. You can choose to add steps in the creation of the cluster, but this can also be done at a later time. Press next.
In the Hardware Configuration screen, we can configure the arrangement and
selection of the machines. We suggest starting out with m4.large machines on
spot pricing. You should be fine running a small example workload with a single
master node and two core nodes. Be sure to select spot pricing and
place an appropriate bid. Remember that you can always check the current prices
in the information popup or on the ec2 website.
After selecting the machines, press next.
Please note:
-
You always need a master node, which is tasked with distributing resources and managing tasks for the core nodes. We recommend using the cheap
m4.largeinstance. If you start to notice unexplained bottlenecks for tasks with many machines and a lot of data, you might want to try a larger master node. Ganglia should provide you with some insights regarding this matter. -
By default, there are some limitations on the number of spot instances your account is allowed to provision. If you don't have access to enough spot instances, the procedure to request additional can be found in the AWS documentation.
In the General Options you can select a cluster name. Name it after your
group, e.g. group-01. You can tune where the system logs and a number of other
features (more information in the popups). After finishing this step, press
next.
You should now arrive in the Security Options screen. If you have not created an EC2 keypair, it is recommended that you do so now. This will allow you to access the Yarn, Spark, and Ganglia web interfaces in your browser. This makes debugging and monitoring the execution of your Spark Job much more manageable. To create an EC2 keypair, follow these instructions .
After this has all been completed you are ready to spin up your first cluster by pressing Create cluster. Once the cluster has been created, AWS will start provisioning machines. This should take about 10 minutes. In the meantime you can add a step. Go to the Steps foldout, and select Spark application for Step Type. Clicking on Configure will open a dialogue in which you can select the application JAR location in your S3 bucket, as well as any number of arguments to the application, spark-submit, as well as your action on failure.
The setup will take some time to finish, so in the meantime you should configure a proxy for the web interfaces. More detailed information can be found on the AWS website. You can check the logs in your S3 bucket, or the web interfaces to track the progress of your application and whether any errors have occurred.
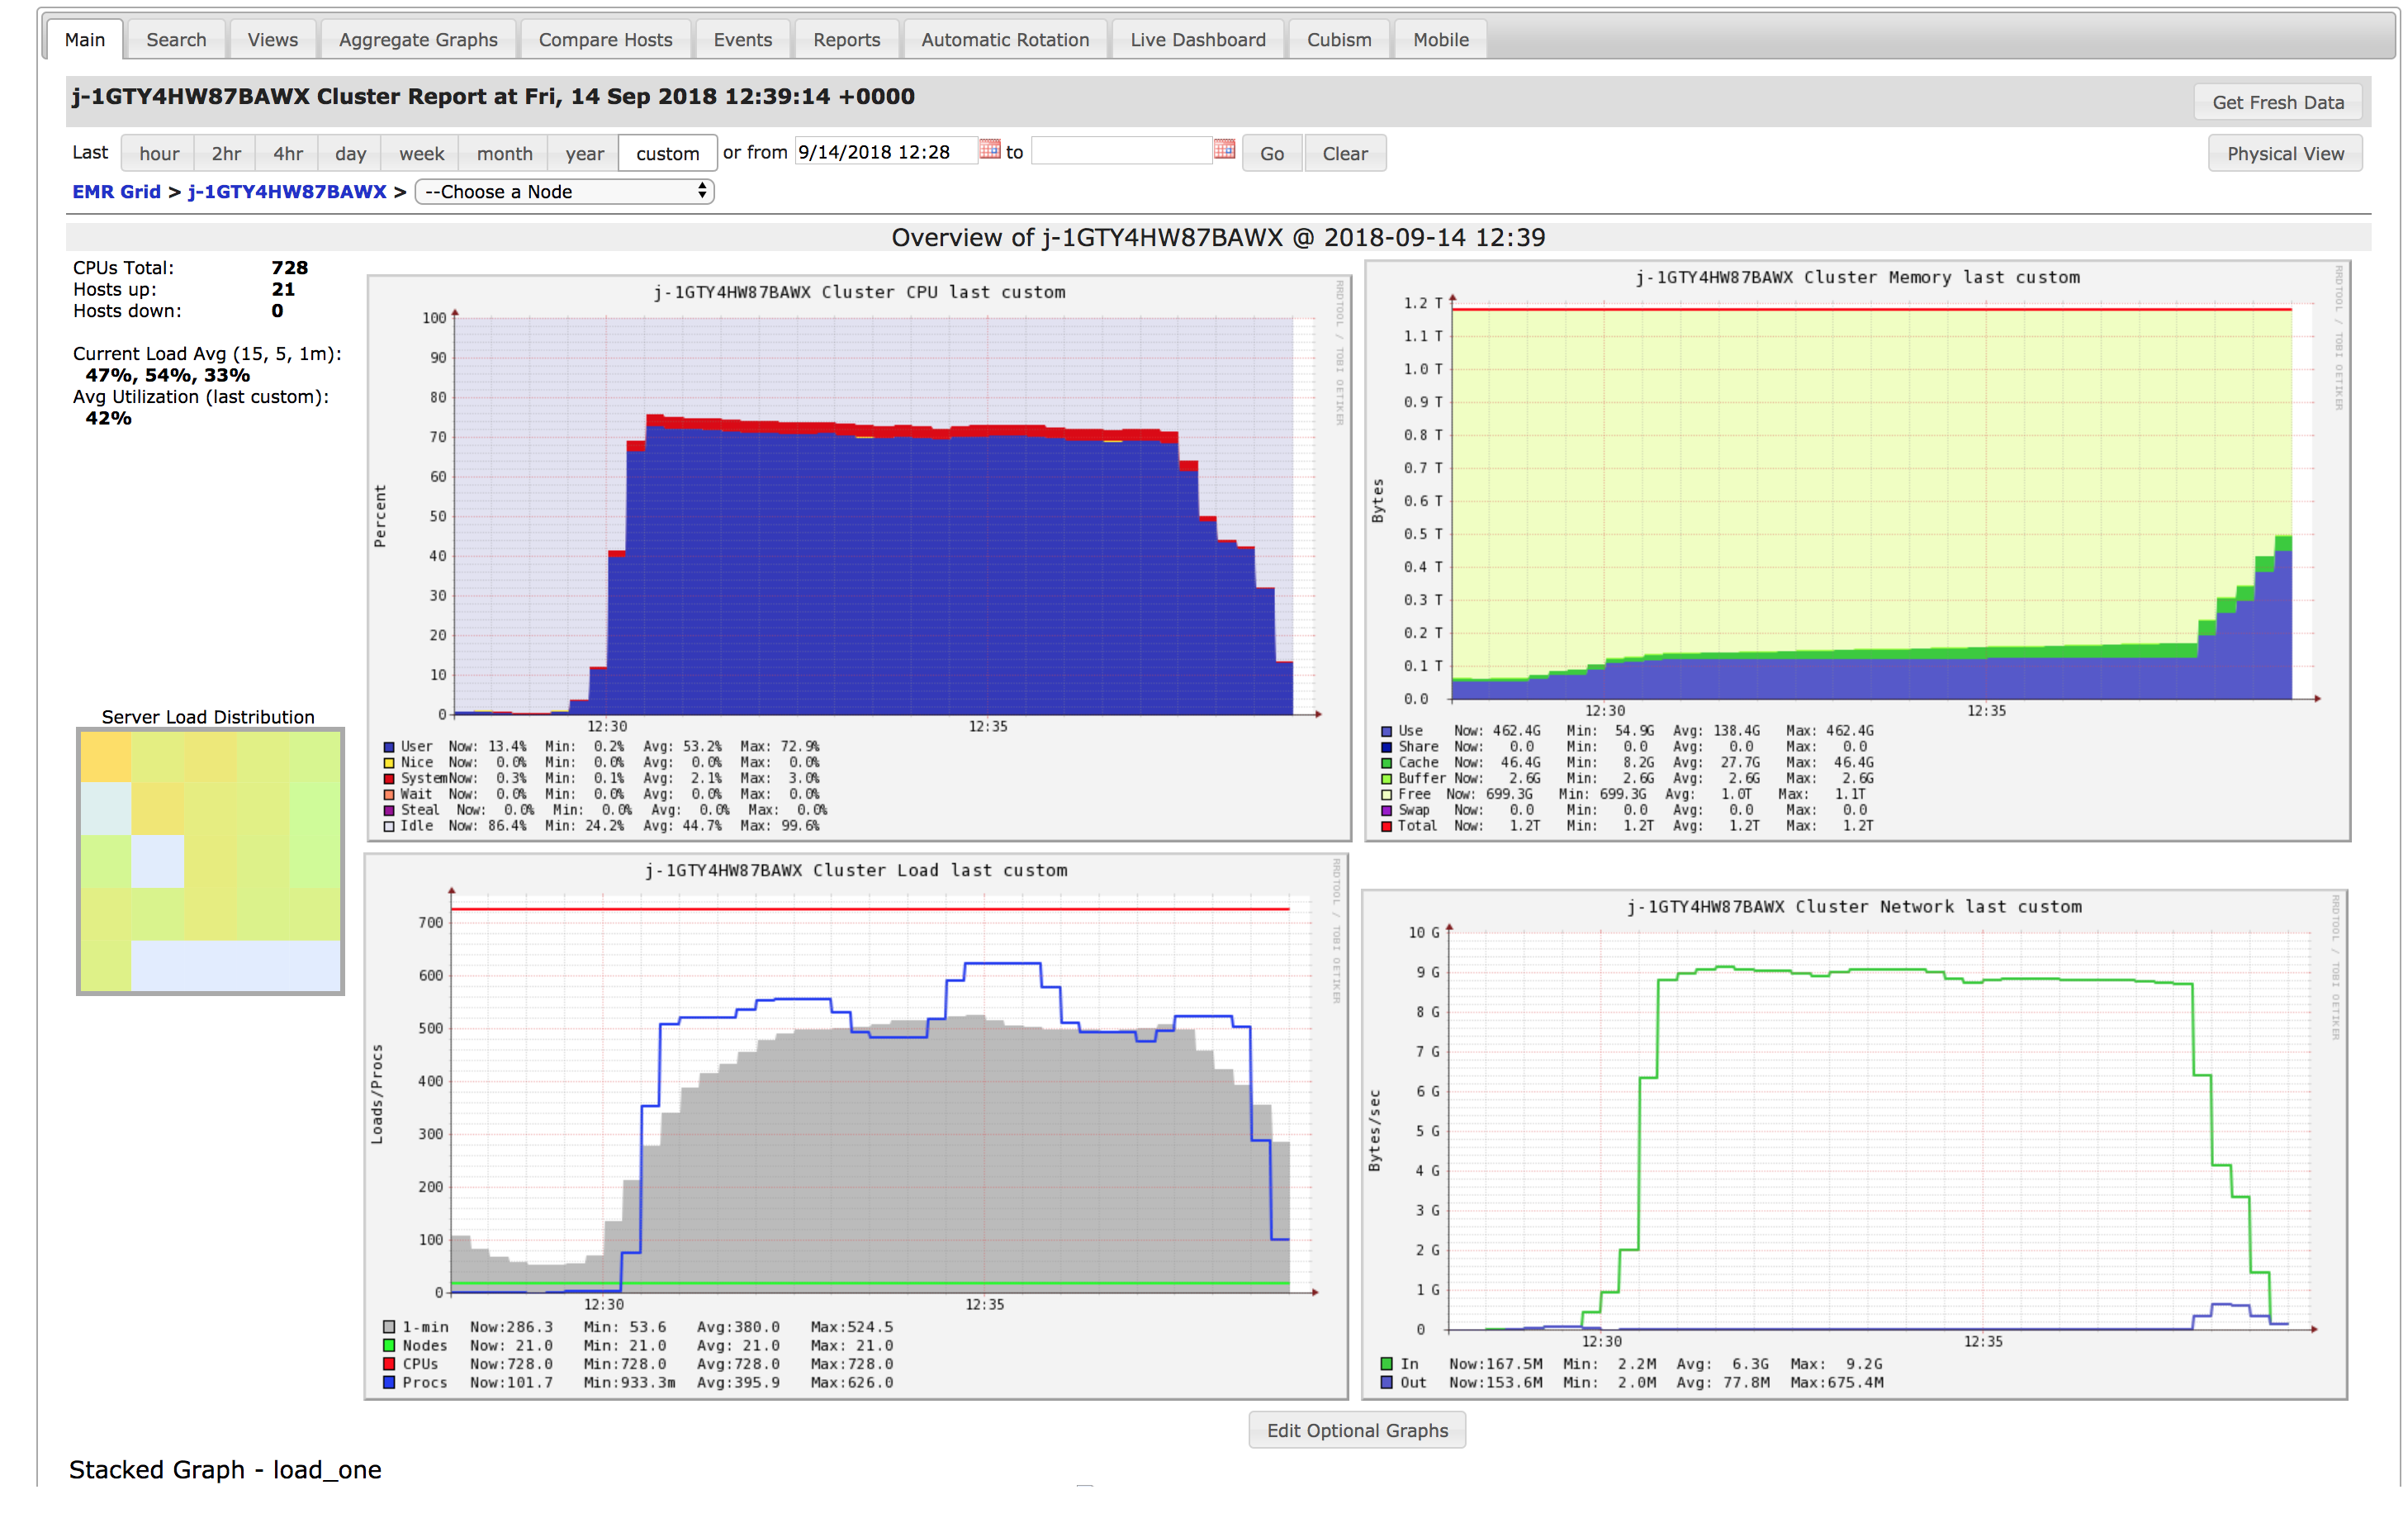
By forwarding the web interfaces you will also have access to Apache Ganglia. Ganglia is a tool that allows you to monitor your cluster for incoming and outgoing network, CPU load, memory pressure, and other useful metrics. They can help to characterize the workload at hand, and help optimizing computation times. An example of its interface is shown in the figure below.
It's not uncommon to run into problems when you first deploy your application to AWS, here are some general clues:
-
You can access S3 files directly using Spark, so via
SparkContext.textFileandSparkSession.read.csv, but not using the OS, so using an ordinaryFilejava class will not work. If you want to load a file to the environment, you will have to figure out a workaround. -
You can monitor the (log) output of your master and worker nodes in Yarn, which you can access in the web interfaces. It might help you to insert some helpful logging messages in your Application.
-
Scale your application by increasing the workload by an order of magnitude at a time, some bugs only become apparent when you have a sufficient load on your cluster and a sufficient cluster size. In terms of cost, it's also much cheaper if you do your debugging incrementally on smaller clusters.
-
Ensure that your cluster is running in actual cluster mode (can be visually confirmed by checking the load on the non-master nodes in Ganglia).